Thursday, March 21, 2013

Chicken Enchilada Bake


So I saw this recipe using Rotel, tortillas, and Cream of Chicken soup, and then I had a brilliant idea... what if I turned my Nana's Chicken Enchilada recipe into a quick and easy dish without any frying, messy hands, or rolling of chicken falling out of the wrapped tortillas? And that was when my concept of a Chicken Enchilada Bake was born. I will still admit that my Nana's real enchiladas are still top-notch, that will probably never change. But this dish was a TON easier to make and clean up afterwards (and the taste was pretty stellar as well)! And when it comes down to it, I'm all about the simplicity in cooking as well as the taste. This dish succeeded on both fronts, so it passes my test for a wonderful recipe. Enjoy!

CHICKEN ENCHILADA BAKE

Servings: 4

Nutritional Information:
WW Points Plus: 10+ for 1/4 dish

Ingredients:
  • 12 corn tortillas
  • 2/3 can Healthy Request Cream of Chicken soup
  • 1 can Old El Paso Mild enchilada sauce
  • 1 lb pulled chicken (or a rotisserie chicken breast cut into pieces)
  • 1 c WW Mexican cheese (1/2 c for inside dish, 1/2 on top)
  • Tomato, sliced
Directions:
  1. Preheat oven to 350°F.
  2. Cut tortillas into small length-wise strips and set aside.
  3. Combine an entire can of enchilada sauce with some of the can of cream of chicken soup (enough to add thickness) in a bowl and set aside.
  4. Slice a tomato (or more depending on how much you like them) into small chunks and set aside.
  5. Place the tortilla strips into the bottom of the pan, enough to create a bottom layer.
  6. Next, add some of the pulled chicken on top of the tortillas and coat it with the soup/sauce mixture, adding some of the cheese.
  7. Repeat the layering process until you have reached the top of the pan.
  8. On the top layer, cover with tortilla strips and a little bit of sauce.
  9. Let cook in the oven for about 35 minutes before adding 1/2 c of cheese to the top of the dish and allowing it to cook for an additional 5 minutes (or until cheese is slightly melted).
  10. Enjoy!

Now who could pass up on something as delicious-looking as this?

Tuesday, March 19, 2013

Almond Cupcakes for Two


It was my dad's birthday tonight, and I really wanted to make him a special birthday treat (cake-wise that is), but not something with a massive quantity. You see, I'm not one for putting 30 cupcakes in the house (as I know I WILL end up eating them, without a doubt), especially when my mother has given up white flour for lent and when my father still has his chocolate-chip cookies coming on the way from my Nana. We don't need all that dessert, but I did want a cupcake and for my dad to have something a little sweet for his birthday to go with his favorite dinner (of my Mom's Meatloaf).

But all those darn cake boxes at the store would yield 2 DOZEN cupcakes. Now I have friends, but I still don't know what I'd do to get rid of 24 cupcakes sitting on our kitchen counter. I had seen a recipe of cupcakes for two before, so I figured I would give it a go... but once again pull out my variation on a theme card to try and make them slightly healthier.

The result was surprisingly good, although I will sheepishly admit that I was so excited that I may have pulled them out of the oven a little too soon after only 15-20 minutes. They were slightly doughy, but if that's the only thing I would fix, I consider these a wonderful treat (I kind of liked them that way). They actually kind of came out pretty similar to my favorite almond-flavored sugar cookies from Eileen's Colossal Cookies back when I went to school at KU. Wow, were those the best. I was even able to individualize each cupcake, topping my dad's with a simple powdered sugar/water/vanilla icing with sprinkles and mine with fat-free whipped cream and strawberries. Almond strawberry shortcake? Yes, please.

ALMOND CUPCAKES FOR TWO

Servings: 2 cupcakes total

Nutritional Information:
WW Points Plus: 3+ per cupcake
Ingredients:
  • 1 egg white
  • 3 packets of Stevia (roughly 2 TBSP sugar)
  • 2 TBSP margarine (or butter)
  • 1/2 tsp vanilla 
  • 1 tsp almond (I really like it)
  • 1/4 c flour
  • 1/4 tsp baking powder*
  • 1/4 tsp salt*
  • 1 1/2 TBSP skim milk
* I may omit one of these two ingredients the next time I make this recipe if it doesn't affect the baking too much... the sodium count in the nutrition was a bit too high for me. 

Directions:

Update: These things were so good I had to make them again tonight (less than a week later)... I took out the salt entirely, used half of the baking powder, added some cream of tarter/1 tsp powdered sugar, only used 1 TBSP skim milk, and cooked them for 22 minutes. They were a much better consistency than the first time!
  1. Preheat oven to 350° F.
  2. Gently whisk and egg white in a small bowl, adding in sugar substitute, margarine, extracts, and salts. 
  3. Gradually add flour until 1/4 c has been added.
  4. Pour in about 1 1/2 TBSP of milk to help create more of a cake batter mixture (try not to eat the dough... I will attest to how hard of a task this is... I did lick the spoon, though).
  5. Place two muffin/cupcake papers into a muffin tin and divide the batter into each tin.
  6. Add water to the additional empty tins (to keep them from burning in the oven).
  7. Bake for about 20-25 minutes (or until batter looks completely cooked).
  8. Allow for them to cool and then top with your favorite icing/fruit/etc.
  9. Enjoy!

Monday, March 18, 2013

Seasoned Spaghetti Squash


You know, I really have no idea how this dish turned out. I had to head to a Zumba and Butts & Guts class that night, and I only was able to prepare the dish and stick it in the refrigerator covered in tin foil with a note written in permanent marker on top saying to bake it in the oven for about 20 min on 350° (or until the cheese melted). It looks like it turned out pretty well, though, and I didn't hear any "Yuck! Never make that again!" so I'm assuming it was alright.

If anything, it looks pretty good to me. Maybe I'll just have to make it again sometime so I can try it.

SEASONED SPAGHETTI SQUASH

Servings: More than you think. I'm not really sure on an exact count...

Nutritional Information:
WW Points Plus: 1-2+ (depending on what you add, because the squash is 0+!)

Ingredients:
  • Medium spaghetti squash
  • 1/2 tsp Garlic powder
  • 1/3 c WW Italian blend cheese (Mozzarella/Parmesan/etc)
  • 1 TBSP Margarine 
Directions:
  1. Preheat oven to 350° F and poke a few holes in the sides of the spaghetti squash.
  2. Bake it for about 30 minutes or until the skin is soft enough to easily cut through (Note: I have also heard that you can microwave it for about 5-10 minutes... but that you should definitely pierce it first.)
  3. Carefully remove it from the oven and cut the squash in half.
  4. Remove all seeds and place them in a separate dish.
  5. Place the squash back into the oven and allow it to cook for another 15-20 or so minutes.
  6. Once again, remove it from the oven and allow it to cool for a few minutes (Note: If you skip this step because you think you will be late to your Zumba class, you will slightly burn your fingers).
  7. When cool, use a fork to remove the spaghetti strands from the squash, scooping them into a separate bowl. They should pull apart loosely (if they do not, put it back in the oven to cook longer... shout-out to my aunt who gave me that tip).
  8. When all strands have been removed, combine with butter/margarine, spices, and cheese (or whatever other flavorings you choose to use... could be anything from cinnamon/nutmeg to salsa to chicken...).
  9. Add mixture to a pan and allow to cook for about 20 minutes, or until the cheese is slightly melted.
  10. Enjoy!

Friday, March 15, 2013

Cheesy Lasagna Roll-Ups


While I'm sure it probably would've been easier to just pop a WW lasagna meal in the microwave, there's just something wonderful about a homemade dinner. The kind NOT from a box. Despite the fact this meal has its dry pasta come from a box, that's about it. Otherwise, it's that delicious, fresh, real-deal feeling of pasta that hasn't been sitting in your local grocery store's freezer for... well, who knows how long.

While I was originally planning on using real garlic, onion, diced tomatoes and olive oil for this recipe (much similar to my Baked Turkey Penne recipe), I decided against it and to just go ahead and use sauce instead. That recipe was a dud in my eyes, much in contrast to my fabulous Cheesy Chicken Stuffed Shells recipe. So this meal is basically the same as that one, although with subtle changes. Eh, guess it's that variation on a theme again... At any rate, this meal was just as fantastic as its predecessor. Enjoy!

CHEESY LASAGNA ROLL-UPS

Servings: 2 noodles/person

Nutritional Information:
WW Points Plus: 5+ per lasagna roll-up


Ingredients:
  • About 8 lasagna noodles
  • 1 cup pasta sauce
  • 1 large egg white, gently beaten
  • 1 c fat free ricotta cheese
  • 8 oz extra lean ground turkey
  • 2 tsp garlic powder
  • 1/2 tsp oregano
  • 1/2 tsp basil
  • 3/4 c WW Italian blend cheese
  • 1/4 c grated parmesan cheese
Directions:
  1. Preheat oven to 350° F.
  2. Cook lasagna noodles in boiling water according to the box directions. Rinse with cool water and set aside.
  3. Heat the lean ground turkey on the stove until fully cooked/begins to brown (as much as extra lean gets).
  4. Lightly spray a 9 x 13 pan with cooking spray and coat the bottom of the pan with a few spoonfuls of the pasta sauce.
  5. In a separate bowl, combine beaten egg whites, ricotta, spices, 1/4 of the Italian cheese, and 2 TBSP of parmesan cheese.
  6. Cover each lasagna noodle with the mixture and meat and place finished noodles in the baking dish over the sauce.
  7. Spread remaining sauce on the top of the noodles and sprinkle with remaining cheese.
  8. Bake until the cheese begins to melt (not too long, you don't want burnt cheese) and enjoy!

Seriously, who would want something frozen when they can have something FRESH?

Tuesday, March 12, 2013

Creamy Crock Pot Chicken & Gravy


I don't know what I liked more about this dish... the simplicity of making it, the smell throughout the house or the taste. 

CREAMY CROCK POT CHICKEN & GRAVY

Servings: 4

Nutritional Information:
WW Points Plus: 6+ for 1/4 dish, 8+ for 1/3 dish


Ingredients:
  • 2 chicken breasts (about 20 oz)
  • Can of Healthy Request Cream of Chicken soup
  • Envelope of French's chicken gravy mix
  • 1 soup can of water
  • Key ingredient to this dish: LOVE

Directions:
  1. Empty can of soup and packet of gravy into the crockpot, combining mixture with one soup-can full of water before stirring throughly.
  2. Place chicken into the crockpot and coat with the soup/gravy mixture.
  3. Let cook 4-6 hours on low.
  4. Enjoy!

Monday, March 11, 2013

English Muffin Pizzas


Cooking Cadenza doesn't just include those "fancy pants" recipes that take forever for you to make and cook. So while this dish is once again a very simple meal, sometimes all it takes is a simple reminder to mix up your usual routine with something a little different. So here's one of my favorite (easy-to-make) lunches... Enjoy! 

ENGLISH MUFFIN PIZZAS

Servings: 1

Nutritional Information:
WW Points Plus: 3+ for (Light Multigrain) English Muffin, 1+ for sauce, 2+ for cheese = 6+ total

Ingredients:
  • Light multigrain English muffin
  • About 1/4 cup Contadina pizza squeeze (or other sauce)
  • 1/3 cup WW Mexican or Italian cheese blend
Directions:

I think these are fairly self-explanatory, but just in case there was any confusion:
  1. Cut English muffin in half and coat each side with pizza sauce.
  2. Cover sauce with cheese/additional toppings and zap in the microwave for about 30-45 seconds (or until cheese begins to melt).
  3. Enjoy!

Thursday, March 7, 2013

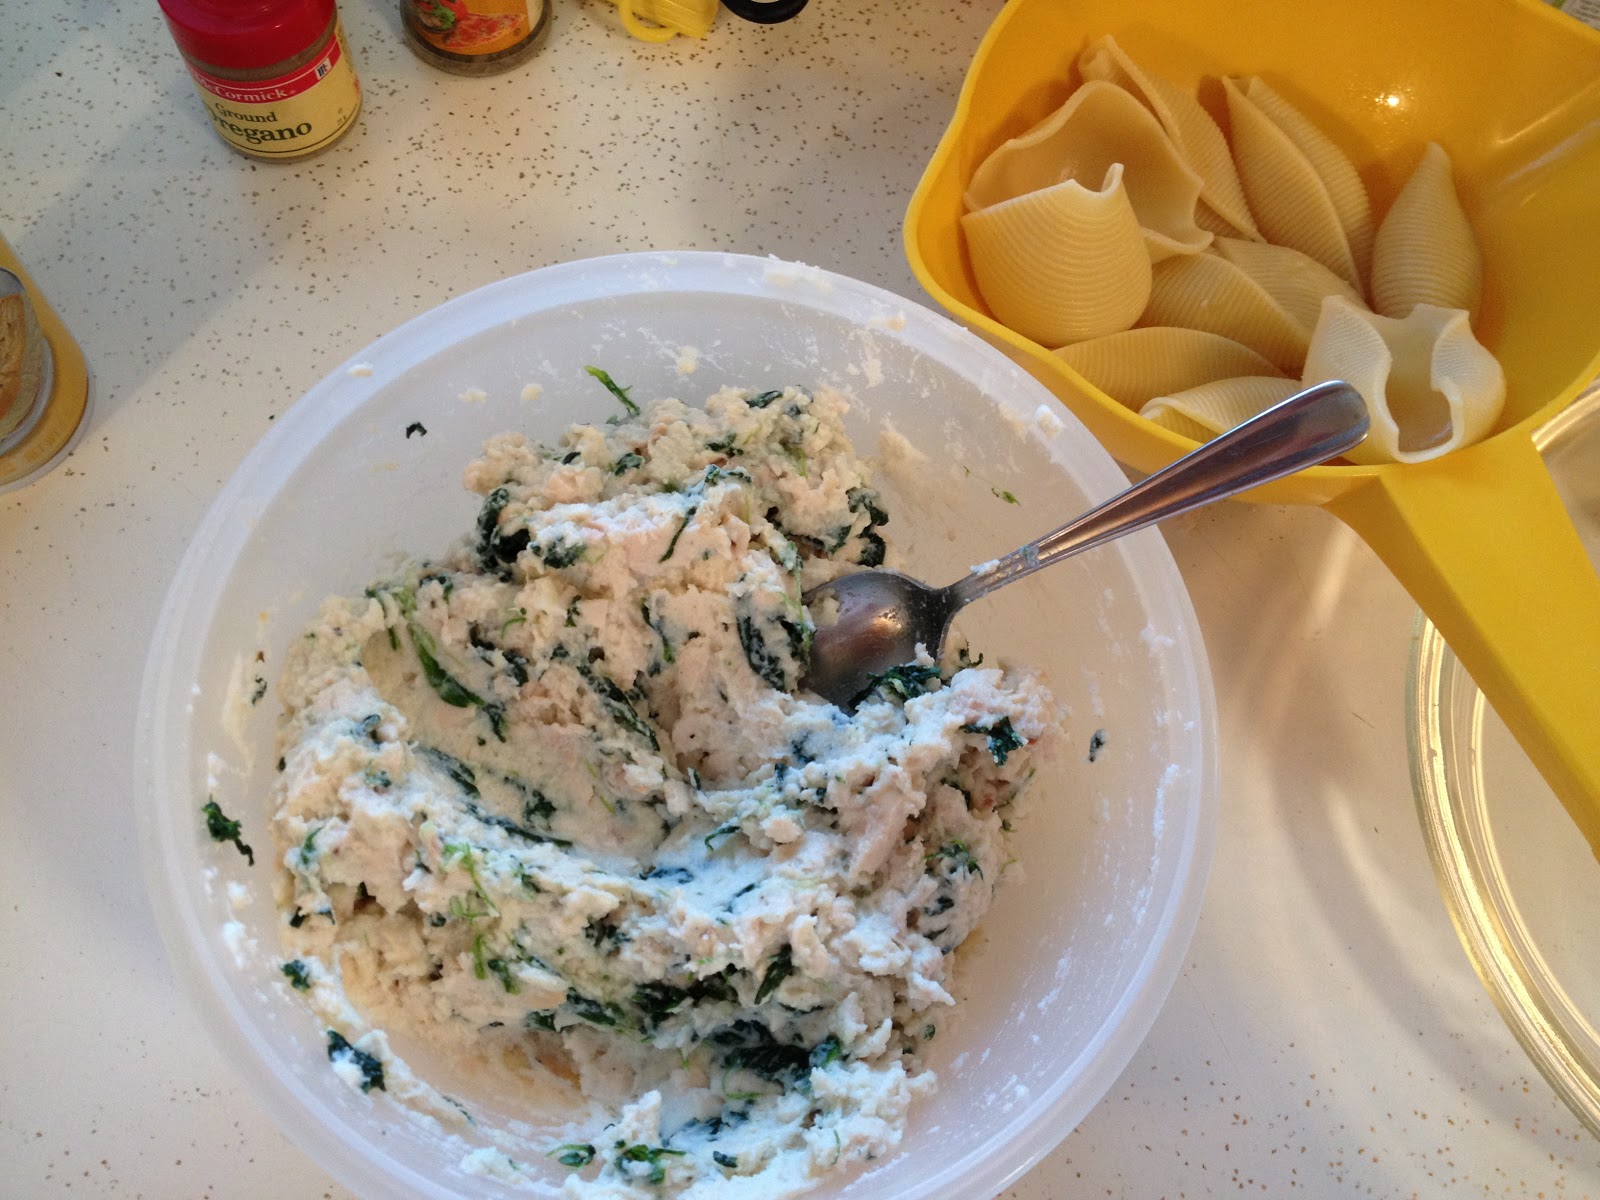
Cheesy Chicken Stuffed Shells


My Nana ate her entire plate of this dinner (if you knew her, you would know how rare of an occasion this is). And if the master chef says its good and continues to talk about how delicious it was the following day, you know this dish has to be pretty darn fantastic. Needless to say, I'll probably end up making this recipe more than once in the future (just like how my mom requested my Parmesan Ranch Chicken over again this week). This recipe is basically from Weight Watchers, although has been slightly adapted... Enjoy!

CHEESY CHICKEN STUFFED SHELLS

Servings: Makes about 12-18 shells total (3-6 people)

Nutritional Information:
WW Points Plus: 3+ per shell
Ingredients:
  • About 12-18 jumbo pasta shells 
    • Note: It may be wise to boil/cook more shells than you think you may need in case they break!
  • About 1½ c pasta sauce/canned tomato sauce
  • 2 large egg whites, gently beaten
  • 1¾ c part skim ricotta cheese
  • 8 oz. roasted skinless boneless chicken breast
  • 2/3 c frozen spinach (chopped) thawed (drain all excess water)  
  •  2 tsp garlic powder
  •  ½ tsp oregano
  • ½ tsp basil
  • ¾ c part-skim mozzarella cheese (shredded)
  • ¼ c grated parmesan cheese
Directions:
  1.  Preheat oven to 350° F.
  2. Cook shells in boiling water according to box directions. Rinse with cold water and set aside for later use.
  3. Lightly spray a 9 x 13 pan with cooking spray and coat the bottom of the pan with some of the pasta sauce (about ½ c or so) and set aside.
  4. Using a food processor (or knife), cut/chop the chicken until into small pieces.
  5.  In a separate bowl, combine egg whites, ricotta, chicken, spinach, garlic powder, basil, and oregano. Stir in ¼ c of mozzarella and 2 TBSP of parmesan cheese.
  6. Fill each shell with mixture and place filled shells in the baking dish on top of the sauce. Spread remaining sauce on top. Sprinkle with remaining cheese and bake until cheese begins to melt.
  7. Enjoy!